
Write-Back Flash Cache是Exadata数据库一体机性能加速的一个很重要选项。如果没启用,可以通过下面的方式启用。本文摘自Oracle官方网站。除了这些,还有很多。
Use
the Write-Back Flash Cache feature to leverage the Exadata Flash
hardware and make Exadata Database Machine a faster system for Oracle
Database Deployments.
Since
its availability in 2008, Oracle Exadata has evolved from a data
warehousing machine to a powerful solution for consolidation. With the
addition of many features from version to version, the machine has
become efficient in handling Data warehousing and OLTP workloads
together. Achieving Extreme performance is always the goal for Exadata
and its new features like Smart Scan, Smart Flash Cache, and Smart Flash
Logging have made it possible. The latest feature, Write back flash
cache, is another addition to the key enablers of Exadata’s Extreme Performance which again the combination of Hardware (Flash
Drives) and Software (Exadata Storage Server Software) engineered
together.
There
are two key features of the Exadata Storage Server Software that
leverage the Exadata Flash hardware and make the Exadata Database
Machine such a fast system on which to deploy the Oracle Database. First
is Exadata Smart Flash Cache which provides the capability to stage
active database objects in flash. Second is the Exadata Smart Flash
Logging which speeds the critical function of database logging. Lastly,
the deployment of the Oracle Database requires mission critical
resilience and the Exadata Storage Server Software in conjunction with
the Oracle Database provides that.
Write back flash cache provides the ability to cache write I/Os directly to PCI flash in addition to read I/Os.If any application is write intensive and if one finds significant waits
for "free buffer waits" or high IO times to check for write bottleneck
in AWR reports, then write back flash cache is the best suitable option.
As long as the minimum software requirements are met, any Exadata hardware with flashcache (V2 and later) can take advantage of this feature. In release 11.2.3.2.0, FlashCache is “WriteThrough” by default. ALTER CELL command is used to change this mode to “WriteBack”.
Write-back
flash cache significantly improves the write intensive operations
because writing to flash cache is faster than writing to Hard disks.
According to Oracle depending on application, on X3-2 machines write
performance can be improved up to 20X IOPS than disk and 10X more write
IOPs than to disk on V2 and X2. Cell Attribute “flashCacheMode” determines this mode, the possible values are: “WriteThrough” and “WriteBack”.
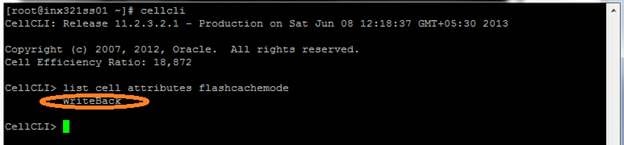
LIST CELL shows the current value.
CELLCLI> list cell attributes flashcachemode
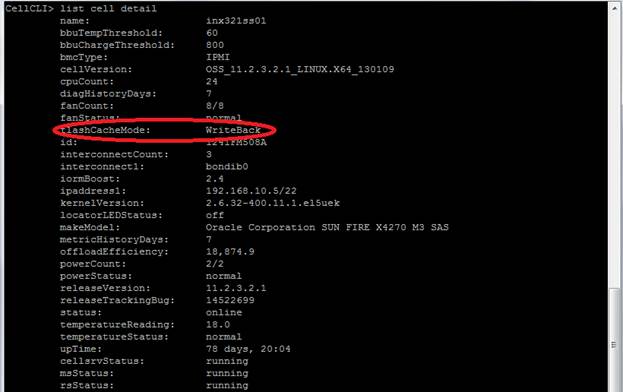
CELLCLI> list cell detail
Write-Back Flash Cache:
Write-Back Flash Cache Benefits:
Write-Back Flash Cache – Data Flow:
1. DB Write Request - (Write to flash or disk), persist, ack
2. DB Read Request – (Read from cache or disk), populate, persist
How to enable Write-Back Flash Cache:
Methods are available:
1. Rolling Method
2. Non-Rolling Method
Note: Before performing the below steps, Perform the following check as root from one of the compute nodes:
Check all griddisk “asmdeactivationoutcome” and “asmmodestatus” to ensure that all griddisks on all cells are “Yes” and “ONLINE” respectively.
Rolling Method:
(Assuming that RDBMS & ASM instances are UP and enabling Write-Back Flash Cache in One Cell Server at a time)
Login to Cell Server:
Step 1. Drop the flash cache on that cell
#cellcli –e drop flashcache
Step 2. Check the status of ASM if the grid disks go OFFLINE. The following
command should return 'Yes' for the grid disks being listed:
Step 3. Inactivate the griddisk on the cell
Step 4. Shut down cellsrv service
Step 5. Set the cell flashcache mode to writeback
Step 6. Restart the cellsrv service
Step 7. Reactivate the griddisks on the cell
Step 8. Verify all grid disks have been successfully put online using the following command:
Step 9. Recreate the flash cache
# cellcli -e list griddisk attributes name,asmmodestatus,asmdeactivationoutcome
Non-Rolling Method:
(Assuming that RDBMS & ASM instances are DOWN while enabling Write-Back Flash Cache)
Step 1. Drop the flash cache on that cell
Write-Back Flash Cache Not Required for DiskGroup:
Note: We can disable Write-Back Flash Cache diskgroups like RECO not requiring this feature. This can save space in the flash cache.
CACHINGPOLICY could be used to change the flash cache policy of the griddisk.
Before changing the cache policy from default to none, ensure there is no cached data in flash cache for the grid disk:
CellCLI> create griddisk all harddisk prefix=RECO, size=1006, cachingPolicy="none“
OR
CELLCLI>ALTER GRIDDISK grid_disk_name FLUSH
Flushing the data from Flash Cache to Disk – Manual Method:
The data which is not been synchronized with griddisk can be synchronized using the FLUSH option.
CELLCLI>ALTER GRIDDISK grid_disk_name FLUSH
Use the following command to check the progress of this activity:
CELLCLI>LIST GRIDDISK ATTRIBUTES name, flushstatus, flusherr
Reinstating WriteThrough FlashCache:
1. To reinstate Writethrough caching, FlashCache must first be flushed.
2. FlashCache must then be dropped and cellsrv stopped.
Step 1. CELLCLI> alter flashcache all flush
Step 2. CELLCLI> drop flashcache
Step 4. CELLCLI> alter cell flashCacheMode = WriteThrough
Step 5. CELLCLI> alter cell startup services cellsrv
Monitoring Flash Cache Usage:
CELLCLI> list metricdefinition attributes name, description where name like '.*_DIRTY‘
CD_BY_FC_DIRTY
Number of unflushed bytes cached in FLASHCACHE on a cell disk
FC_BY_DIRTY
Number of unflushed bytes in FlashCache
FC_BY_STALE_DIRTY
Number of unflushed bytes in FlashCache which cannot be flushed. Because cached disks are not accessible
GD_BY_FC_DIRTY
Number of unflushed bytes cached in FLASHCACHE for a grid disk
# dcli -g cell_group -l root cellcli -e list griddisk attributes asmdeactivationoutcome, asmmodestatus
Check that all of the flashcache are in the “normal” state and that no flash disks are in a degraded or critical state:
# dcli -g cell_group -l root cellcli -e list flashcache detail
# cellcli -e list griddisk attributes name,asmmodestatus,asmdeactivationoutcome
# cellcli –e alter griddisk all inactive
# cellcli -e alter cell shutdown services cellsrv
# cellcli -e "alter cell flashCacheMode=writeback"
# cellcli -e alter cell startup services cellsrv
# cellcli –e alter griddisk all active
# cellcli -e list griddisk attributes name, asmmodestatus
# cellcli -e create flashcache all
Step 10. Check the status of the cell to confirm that it's now in WriteBack mode:
# cellcli -e list cell detail | grep flashCacheMode
Step 11. Repeat these same steps again on the next cell to the FINAL cell.
However, before taking another storage server offline, execute the
following making sure 'asmdeactivationoutcome' displays YES:
# cellcli -e drop flashcache
Step 2. Shut down cellsrv service
# cellcli -e alter cell shutdown services cellsrv
Step 3. Set the cell flashcache mode to writeback
# cellcli -e "alter cell flashCacheMode=writeback"
Step 4. Restart the cellsrv service
# cellcli -e alter cell startup services cellsrv
Step 5. Recreate the flash cache
# cellcli -e create flashcache all
CELLCLI>ALTER GRIDDISK grid_disk_name CACHINGPOLICY="none"
Step 3. CELLCLI> alter cell shutdown services cellsrv
Reference
https://www.oracle.com/technetwork/articles/database/exadata-write-back-flash-2179184.html