

VirtualBox是一款开源虚拟机软件。VirtualBox是由德国 Innotek公司开发(2008年2月,InnoTek软件公司被Sun公司所并购),由Sun Microsystems公司出品的软件,在Sun被Oracle收购后正式更名成Oracle VM VirtualBox。Innotek以GNU General Public License (GPL)释出VirtualBox,并提供二进制版本及OSE版本的代码。使用者可以在VirtualBox上安装并且执行Solaris、 Windows、DOS、Linux、OS/2 Warp、BSD等系统作为客户端操作系统。现在则由甲骨文公司进行开发,是甲骨文公司xVM虚拟化平台技术的一部份。
Oracle VirtualBox号称是最强的免费虚拟机软件,它不仅具有丰富的特色,而且性能也很优异!它简单易用,可虚拟的系统包括Windows(从Windows 3.1到Windows10、Windows Server 2012,所有的Windows系统都支持)、Mac OS X、Linux、OpenBSD、Solaris、IBM OS2甚至Android等操作系统!使用者可以在VirtualBox上安装并且运行上述的这些操作系统!与同性质的VMware及Virtual PC比较下,VirtualBox独到之处包括远端桌面协定(RDP)、iSCSI及USB的支持,VirtualBox在客户端操作系统上已可以支持USB2.0/USB3.0的硬件装置,不过要安装 VirtualBox Extension Pack。
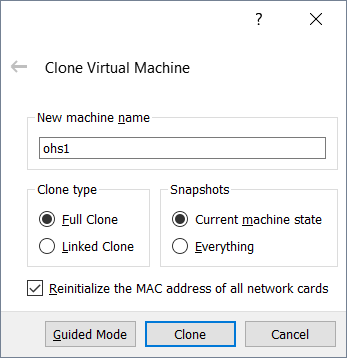
克隆虚拟机注意事项
克隆虚拟机可以帮我们快速的构建所需的环境,在Virtualbox在clone虚拟机时指定'Reinitialize the MAC address of all network cards'时,会增加新的网卡,这个和VMware比起来就显的有点不方便,可以通过下面的步骤,修改网卡的。
注意:Full Clone:会创建一个新的
Linked Clone:会创建一个snapshot,相对于Full Clone会省空间
Current machine state:当前是什么状态就clone什么
Everything:如果做过snapshot,snapshot的信息也会被Clone
Reinitialize the MAC address of all network cards:是否初始化网卡的MAC地址
1.修改/etc/udev/rules.d/70-persistent-net.rules
本例中有两个网卡。删除eth0,eth1的配置,然后把eth2换成eth0,eth3换成eth1
2.修改/etc/sysconfig/network-scripts/ifcfg-eth0,ifcfg-eth1中MAC地址,IP地址
3.最后修改机器名,之后就可以正常使用了70-persistent-net.rules修改前后对比
root@ohs4 ~]# cat /etc/udev/rules.d/70-persistent-net.rules
# This file was automatically generated by the /lib/udev/write_net_rules
# program, run by the persistent-net-generator.rules rules file.
#
# You can modify it, as long as you keep each rule on a single
# line, and change only the value of the NAME= key.


# PCI device 0x8086:0x100e (e1000)
SUBSYSTEM=="net", ACTION=="add", DRIVERS=="?*", ATTR{address}=="08:00:27:b7:57:25", ATTR{type}=="1", KERNEL=="eth*", NAME="eth0"

# PCI device 0x8086:0x100e (e1000)
SUBSYSTEM=="net", ACTION=="add", DRIVERS=="?*", ATTR{address}=="08:00:27:31:f3:ef", ATTR{type}=="1", KERNEL=="eth*", NAME="eth1"

# PCI device 0x8086:0x100e (e1000)
SUBSYSTEM=="net", ACTION=="add", DRIVERS=="?*", ATTR{address}=="08:00:27:96:a7:75", ATTR{type}=="1", KERNEL=="eth*", NAME="eth2"

# PCI device 0x8086:0x100e (e1000)
SUBSYSTEM=="net", ACTION=="add", DRIVERS=="?*", ATTR{address}=="08:00:27:35:39:46", ATTR{type}=="1", KERNEL=="eth*", NAME="eth3"
[root@ohs4 ~]# vi /etc/udev/rules.d/70-persistent-net.rules
[root@ohs4 ~]# cat /etc/udev/rules.d/70-persistent-net.rules
# This file was automatically generated by the /lib/udev/write_net_rules
# program, run by the persistent-net-generator.rules rules file.
#
# You can modify it, as long as you keep each rule on a single
# line, and change only the value of the NAME= key.


# PCI device 0x8086:0x100e (e1000)
SUBSYSTEM=="net", ACTION=="add", DRIVERS=="?*", ATTR{address}=="08:00:27:96:a7:75", ATTR{type}=="1", KERNEL=="eth*", NAME="eth0"

# PCI device 0x8086:0x100e (e1000)
SUBSYSTEM=="net", ACTION=="add", DRIVERS=="?*", ATTR{address}=="08:00:27:35:39:46", ATTR{type}=="1", KERNEL=="eth*", NAME="eth1"
修改MAC地址,这个要和70-persistent-net.rules中定义一致[root@ohs4 ~]# cd /etc/sysconfig/network-scripts/ [root@ohs4 network-scripts]# vi ifcfg-eth0 [root@ohs4 network-scripts]# vi ifcfg-eth1 [root@ohs4 network-scripts]# grep HWADDR ifcfg-eth0 HWADDR=08:00:27:96:a7:75 [root@ohs4 network-scripts]# grep HWADDR ifcfg-eth1 HWADDR=08:00:27:35:39:46重启udev和network服务
[root@ohs4 network-scripts]# start_udev
Starting udev:                                             [  OK  ]
[root@ohs4 network-scripts]# service network restart
Shutting down interface eth0:                              [  OK  ]
Shutting down interface eth1:                              [  OK  ]
Shutting down loopback interface:                          [  OK  ]
Bringing up loopback interface:                            [  OK  ]
Bringing up interface eth0:  Determining if ip address 10.0.2.24 is already in use for device eth0...
                                                           [  OK  ]
Bringing up interface eth1:  Determining if ip address 172.16.0.24 is already in use for device eth1...
                                                           [  OK  ]
[root@ohs4 network-scripts]# service NetworkManager start
Setting network parameters...                              [  OK  ]
Starting NetworkManager daemon:                            [  OK  ]
[root@ohs4 network-scripts]# [root@ohs4 network-scripts]#
如何设置共享文件夹
打开Setting-->Shared Folders-->Add Shared Folder,最好不要选择这三个选项,可以通过下面的步骤手动挂载或使用fstab
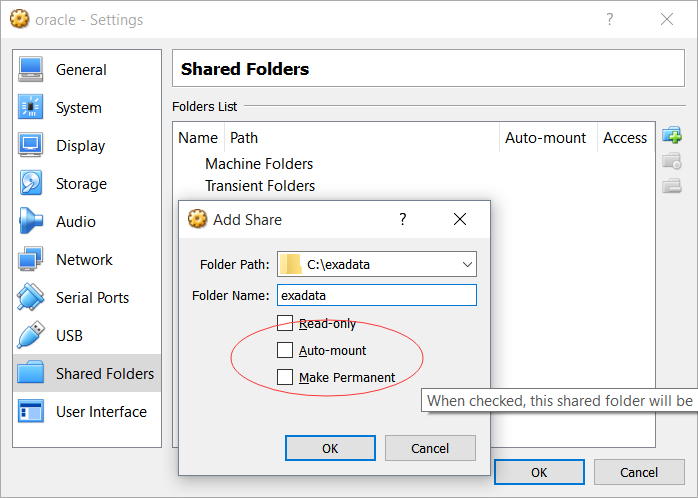
A.mount -t vboxsf sharename mountpoint
B.修改/etc/fstab:
sharename mountpoint vboxsf defaults 0 0
Solaris使用共享文件夹
pkgadd -d VBoxSolarisAddtions.pkg
mount -F vboxfs sharename mountpoint
注意:linux中是vboxsf,solaris中是vboxfs
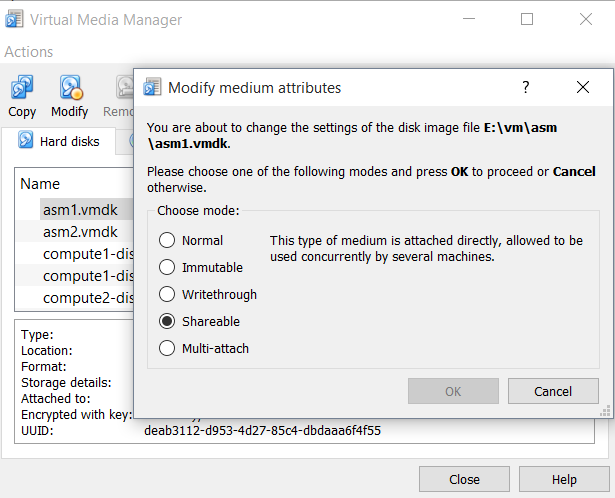
如何配置共享磁盘
VirtualBox支持常见的虚拟控制器IDE, SATA (AHCI), SCSI, SAS and USB-based mass storage devices
打开File-->Virtual Media Manager,选择Shareable模式,然后在其他节点添加
Virtualbox额外的工具需要下面的安装包
[root@ohs3 ~]# rpm -qa|grep kernel|grep devel
kernel-uek-devel-4.1.12-37.4.1.el6uek.x86_64
kernel-devel-2.6.32-642.el6.x86_64
[root@ohs3 ~]#
如果是在Oracle Linux上,可以通过下面的方式来安装
https://blogs.oracle.com/scoter/vbox-ga-rpms
https://blogs.oracle.com/wim/done-cancel-v5
[ol6_developer]
name=Oracle Linux $releasever Development Packages ($basearch)
baseurl=http://yum.oracle.com/repo/OracleLinux/OL6/developer/$basearch/
gpgkey=file:///etc/pki/rpm-gpg/RPM-GPG-KEY-oracle
gpgcheck=1
enabled=1
[ol7_developer]
name=Oracle Linux $releasever Development Packages ($basearch)
baseurl=http://yum.oracle.com/repo/OracleLinux/OL7/developer/$basearch/
gpgkey=file:///etc/pki/rpm-gpg/RPM-GPG-KEY-oracle
gpgcheck=1
enabled=1
yum install kmod-vboxguest-uek4 vboxguest-tools -y
[root@ohs1 ~]# yum install kmod-vboxguest-uek4 vboxguest-tools -y
Loaded plugins: refresh-packagekit, security, ulninfo
Setting up Install Process
ol6_developer
ol6_developer/primary_db
public_ol6_UEKR4
public_ol6_latest
Resolving Dependencies
--> Running transaction check
---> Package kmod-vboxguest-uek4.x86_64 0:5.2.20-1.el6 will be installed
---> Package vboxguest-tools.x86_64 0:5.2.20-1.el6 will be installed
--> Finished Dependency Resolution
Dependencies Resolved
=================================================================================================
Package Arch Version Repository Size
=================================================================================================
Installing:
kmod-vboxguest-uek4 x86_64 5.2.20-1.el6 ol6_developer 325 k
vboxguest-tools x86_64 5.2.20-1.el6 ol6_developer 1.8 M
Transaction Summary
=================================================================================================
Install 2 Package(s)
Total download size: 2.1 M
Installed size: 7.8 M
Downloading Packages:
(1/2): kmod-vboxguest-uek4-5.2.20-1.el6.x86_64.rpm | 325 kB 00:00
(2/2): vboxguest-tools-5.2.20-1.el6.x86_64.rpm | 1.8 MB 00:02
-------------------------------------------------------------------------------------------------
Total 703 kB/s | 2.1 MB 00:03
Running rpm_check_debug
Running Transaction Test
Transaction Test Succeeded
Running Transaction
Warning: RPMDB altered outside of yum.
Installing : kmod-vboxguest-uek4-5.2.20-1.el6.x86_64 1/2
Working. This may take some time ...
Done.
Installing : vboxguest-tools-5.2.20-1.el6.x86_64 2/2
. .
VirtualBox Guest Additions Install completed!
Check installation log: /var/log/vboxadd-install.log
You may need to restart the Window System (or just restart the guest system) to enable the Guest Additions.
Verifying : vboxguest-tools-5.2.20-1.el6.x86_64 1/2
Verifying : kmod-vboxguest-uek4-5.2.20-1.el6.x86_64 2/2
Installed:
kmod-vboxguest-uek4.x86_64 0:5.2.20-1.el6 vboxguest-tools.x86_64 0:5.2.20-1.el6
Complete!
[root@xd06dbadm01 ~]#
https://www.virtualbox.org/manual/UserManual.html
https://www.virtualbox.org/wiki/End-user_documentationhttps://www.virtualbox.org/wiki/Technical_documentation
http://baike.baidu.com/view/1047853.htm